The Underwater Edit Clinic #3: When the Subject Looks Right but the Water Doesn’t

Sometimes an underwater edit reaches an awkward point.
The White Balance looks reasonable.
The exposure is close.
The main subject looks believable.
But something still feels wrong.
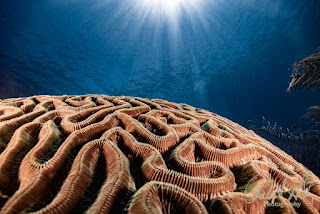
In this photograph, the foreground coral is beginning to work. It has color, texture, and enough tonal separation to hold your attention.
The water does not.
It still looks pale, cyan, and visually weak.
This is where many underwater photographers make the next mistake.
They keep adjusting the entire photograph.
But once part of the photograph is already working, the entire photograph may no longer be the problem.
That changes the decision.
The question is no longer:
What slider should I move next?
The better question is:
Is the whole photograph still wrong, or is only part of it wrong?
That is what we are going to diagnose in this edition of The Underwater Edit Clinic.
Start With the Photograph, Not the Tool
Here is the RAW file we are working with.

At first glance, several things need attention.
The image is cool.
The water is light and cyan.
The foreground does not yet have the depth and separation we want.
But that does not mean every part of the photograph needs the same correction.
That distinction becomes more important as the edit progresses.
In the early stages of an underwater edit, many corrections are global.
White Balance affects the entire photograph.
Exposure and tonal adjustments often begin globally.
Presence and Color may also begin with broader adjustments.
But as the photograph improves, something important happens.
The remaining problems become more specific.
One area may start looking right before another one does.
That is the moment when we need to stop automatically treating the entire photograph as one problem.
What Is Already Working?
Before making another adjustment, I want to ask a question that is easy to overlook:
What is already correct?
In this photograph, the foreground coral becomes believable relatively early in the edit.
It has usable exposure.
Its orange and brown tones begin to look natural.
Texture and detail are visible.
It has enough contrast to separate from the water behind it.
In other words, the subject is beginning to do its job.
That matters.
Once an area of the photograph is working, I do not want to keep changing it simply because something somewhere else still needs attention.
This is one of the most important habits you can develop in Lightroom.
Do not just look for what is wrong.
Also identify what is already right.
The Water Is Still the Problem
Now look beyond the coral.
The water still lacks depth.
It is brighter and more cyan than I want.
The foreground may be working, but the background is not yet supporting it.
At this point, it is tempting to keep pushing global adjustments.
More contrast.
More Dehaze.
More saturation.
A darker overall exposure.
Perhaps another White Balance change.
Some of those changes might improve the water.
But they would also continue changing the coral.
And that creates a new problem.
You begin damaging something that was already working to fix something elsewhere.
That is the diagnostic turning point in this photograph.
A Global Correction Is Only Appropriate When the Problem Is Global
This is the principle I want you to remember from this Edit Clinic:
A global correction is appropriate when the problem is global.
If the entire photograph is too dark, a global Exposure adjustment makes sense.
If the entire photograph has an obvious color cast, White Balance may need attention.
If the whole image lacks tonal structure, broader tonal corrections may still be appropriate.
But that is not where we are anymore.
The foreground and the water now have different correction needs.
The photograph has moved from a global problem to a local problem.
That means the editing decision needs to change with it.
Once Part of the Photograph Is Working, Protect It
Imagine trying to get the water where we want it using only global controls.
We might darken the entire photograph.
The water could improve.
But the foreground coral would also become darker.
We might increase contrast.
Again, the water could gain some definition.
But the coral could become harsher than necessary.
We might push saturation or color globally.
The water could become stronger.
But the orange coral could quickly become too intense.
None of those adjustments are automatically wrong.
The problem is that they affect areas of the photograph that no longer need the same correction.
This leads to one of the central ideas in my editing process:
Once part of the photograph is working, stop changing it to fix something somewhere else.
The Photograph Has Become a Local Problem
Now we have a better diagnosis.
The remaining problem is primarily the water.
So the next question becomes:
Should the next adjustment affect the entire photograph, or only the area that is still wrong?
In this case, the answer is local.
That is where masking becomes useful.
But notice the order.
I did not begin by asking:
How can I use Select Water?
I first diagnosed the photograph.
I determined what was already working.
I identified what was still wrong.
Then I decided the remaining correction should be local.
Only after making that decision do I choose the Lightroom tool to implement it.
That distinction is important.
The tool follows the decision.
The decision does not follow the tool.
Correct Only What Is Still Wrong
Here is the finished photograph.

Compare the relationship between the foreground and the water.
The coral still looks believable.
It retains its texture and color.
But the water now has greater depth.
The cyan appearance is better controlled.
The blue feels richer.
There is stronger visual separation between the subject and the background.
The important point is not that I found a magic setting for blue water.
There is no single Lightroom setting that will work for every underwater photograph.
The important decision was recognizing that the water needed additional correction while the foreground did not need the same treatment.
The correction became targeted because the problem had become targeted.
How Do You Know the Adjustment Worked?
This is where I return to the same diagnostic approach we have been using throughout The Underwater Edit Clinic.
Ask:
What was actually wrong?
Which stage of the workflow owned the problem?
What decision did I make?
How do I know the adjustment worked?
When should I move on?
For this photograph, I would evaluate the finished result by asking:
Does the water now support the subject?
Does the foreground still look believable?
Did I improve the water without damaging the coral?
Does my eye go where I want it to go?
If those relationships are working, I do not need to keep searching for another adjustment simply because Lightroom offers me more controls.
I can move on.
This Is Why Sequence Matters
In the previous Edit Clinic, we looked at a reef photograph that still appeared flat.
The lesson was that Exposure and Tone establish structure before Presence, Color, and Masking try to strengthen it.
That sequence still matters here.
White Balance → Exposure → Presence → Color → Masking
But this photograph adds another layer to the process.
As you move through the sequence, the photograph changes.
The problem you started with may not be the problem you still have.
At first, you may need to correct the whole image.
Later, only one portion of the photograph may need additional work.
Good editing requires you to recognize that change.
That is why I do not want you simply moving through Lightroom controls mechanically.
I want you continually diagnosing the photograph.
Diagnose → Decide → Move On
The goal of The Underwater Edit Clinic is not to give you another collection of slider recipes.
It is to help you make better editing decisions.
For this photograph, the progression was simple:
The overall image needed work.
The foreground began to look believable.
The water was still weak.
Another global adjustment would change areas that were already working.
The remaining problem was local.
So the next correction became local.
That is the process:
Diagnose → Decide → Move On
And the question I want you to carry into your next underwater edit is this:
Is the whole photograph still wrong, or is only part of it wrong?
That one question can keep you from overcorrecting a good subject just because the background still needs work.
Keep Building the System
If you are working on underwater images that look too blue, flat, oversaturated, or inconsistent, my free guide, 10 Lightroom Fixes for Underwater Photos, will help you diagnose some of the most common editing problems and understand where to start.
10 Lightroom Fixes for Underwater Photos:
And if you missed the previous Edit Clinics:
The Underwater Edit Clinic #1: Why Your Underwater Photo Is Still Blue After White Balance
The Underwater Edit Clinic #2: Why Your Underwater Reef Photo Still Looks Flat
The more you understand which part of the workflow owns the problem, the less time you spend guessing.
And that is ultimately what a consistent underwater editing process should give you:
Better decisions, more consistent results, and the confidence to know what to adjust next.
Bob Herb
Robert Herb Photography


Comments
Post a Comment
Please let me know your comments.