The Underwater Edit Clinic #2: Why Your Underwater Reef Photo Still Looks Flat

A reef photograph can have reasonable White Balance, usable exposure, and plenty of color, yet still feel flat.
That is exactly what happened with this photograph.
The first instinct might be to reach for more Contrast, Clarity, Dehaze, Saturation, or stronger masks. Those controls can certainly make an underwater photograph look more dramatic.
But before deciding what to adjust, I want to ask a better question:
What is actually causing the photograph to feel flat?
Flatness is a symptom. It is not a Lightroom control.
In this edition of The Underwater Edit Clinic, we are going to diagnose the photograph first, determine which stage of the workflow is responsible for the problem, and then make the adjustment that actually belongs there.
The goal is not simply to make the reef more dramatic.
The goal is to understand why it looks flat in the first place.
The Starting Photograph

The original RAW file contains plenty of useful information.
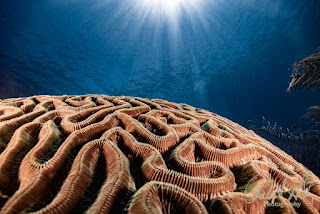
There is a large foreground reef, open blue water, surface light, background sea fans, and a great deal of coral texture.
Nothing essential is missing.
But the photograph lacks the depth and separation I want.
The reef feels compressed. Highlights, midtones, and shadows are not clearly separating the different structures within the scene.
The photograph has information.
What it lacks is organization of that information.
That points me toward Exposure and Tone before Presence or Color.
Diagnose Before You Adjust
My underwater editing sequence remains:
White Balance → Exposure → Presence → Color → Masking → Final Adjustments
So I do not begin by asking:
How much Clarity should I add?
I begin by asking:
Which stage of the workflow owns the problem?
That is the difference between adjusting a photograph and diagnosing one.
Step 1: White Balance Establishes the Foundation
The camera started at approximately:
Temperature: 5350
Tint: +26
I moved the White Balance to approximately:
Temperature: 6350
Tint: +56
That gave the strobe-lit reef a more believable color foundation while retaining the blue ambient water.
But something important happened.
The photograph still looked flat.
That immediately tells me White Balance was necessary, but White Balance was not responsible for the flatness.
This is the same diagnostic principle we explored in Edit Clinic #1: Why Your Underwater Photo Is Still Blue After White Balance:
https://robertherb.blogspot.com/2026/08/underwater-edit-clinic-still-blue-after-white-balance.html
Do not keep asking for one adjustment to solve a problem that belongs elsewhere in the workflow.
White Balance was now doing its job.
So I moved on.
Diagnose → Decide → Move On
Step 2: Build the Tonal Structure
This is where the photograph began to come alive.
My final global settings were approximately:
Exposure: -0.18Contrast: +25Highlights: 0Shadows: +53Whites: -26Blacks: -18
Do not copy those numbers.
They describe what this photograph needed.
The important part is understanding why I made the adjustments.
Opening the Shadows
I raised the Shadows significantly because there was useful reef detail hidden in the darker portions of the scene.
Opening those areas gave me more information to work with.
But there is an important catch.
Opening Shadows by itself can actually make a photograph look even flatter.
So that could not be the end of the tonal work.
Establishing Whites and Blacks
I reduced the Whites and strengthened the Blacks.
Now the darker portions of the reef had more weight, while the brighter areas became easier to control.
That increased the separation between:
bright coral surfaces
middle-tone reef structure
deeper shadow areas
That separation begins to create the feeling of depth.
Adding Contrast With a Purpose
I also increased global Contrast.
The goal was not simply to make the photograph look punchier.
The goal was to strengthen the relationships among tonal regions already present in the image.
That distinction matters.
I was not manufacturing drama.
I was establishing structure.
Structure Before Drama
This is the central lesson of Edit Clinic #2.
If I had immediately applied Clarity, Dehaze, Saturation, or aggressive local masks, the photograph would certainly have changed.
It might even have looked more dramatic at first glance.
But those adjustments would have been sitting atop a weak tonal structure.
That is why I teach:
Structure before drama.
Think of the workflow this way:
- Exposure and Tone establish the structure.
- Presence strengthens that structure.
- Color refines it.
- Masking solves what remains locally.
When those jobs are performed in the proper sequence, each adjustment has a clearer purpose.
Step 3: Now Presence Has Something to Work With
Once the tonal structure was working, I moved to Presence.
For this photograph, I used approximately:
Texture: +30Clarity: +42Dehaze: +11
Those are meaningful adjustments.
And that is exactly why this photograph makes a useful teaching example.
The lesson is not that Clarity or Dehaze are bad.
They are valuable tools.
The problem comes when we ask them to create structure that should have been established earlier.
By this point, the reef already had better tonal separation.
Texture could emphasize fine coral detail.
Clarity could strengthen midtone definition.
Dehaze could add additional separation through the water.
Presence was now supporting the structure instead of trying to replace it.
That is a very different job.
Step 4: Refine the Color
Only after White Balance, Tone, and Presence were working did I turn my attention more deliberately to Color.
Globally, I added approximately:
Vibrance: +28Saturation: +11
I also made selective changes using the Color Mixer, including refinements to the relationships among orange, aqua, blue, and yellow within the reef and surrounding water.
Again, the individual values are not the lesson.
By this stage, I was not asking color to rescue a lifeless photograph.
The tonal structure was already working.
Color was refining what was already there.
This is one reason underwater color often becomes easier to control later in the workflow.
Step 5: Solve What Remains Locally
Once the global photograph was working, I moved into Masking.
One of the primary masks selected the reef area.
Within that mask, I made additional tonal refinements, including approximately:
Exposure: +0.20Contrast: -15Highlights: -32Shadows: +34Whites: -5
I also used additional local adjustments for the background and specific areas of the photograph.
Notice what had changed by this point.
I was no longer trying to rebuild the entire image.
I was refining specific areas.
That is where Masking is strongest.
If I find myself using multiple masks to rescue a photograph globally, I usually want to look back at what happened earlier in the workflow.
Cleanup Comes After the Important Decisions
I also performed routine cleanup, including noise reduction, chromatic aberration correction, and removal of several distracting spots.
Those steps improve the finished photograph.
But they are not what solved the original problem.
The important photographic decisions had already been made.
The Finished Photograph

Now compare the finished photograph with the RAW.
- The reef has more depth.
- The individual coral structures are more clearly separated.
- The darker portions have weight without simply disappearing.
- The brighter areas have energy without dominating the photograph.
- The blue water provides separation from the reef rather than competing with it.
- And yes, the finished photograph has more drama.
But the important point is this:
The drama came after the structure.
Do Not Copy My Numbers
If you take one lesson from this Clinic, do not make it:
“Bob uses +42 Clarity on reef photographs.”
That would miss the point completely.
I adjusted this photograph while watching how each decision affected the image.
Some settings changed more than once before I reached the finished result.
That is normal.
Editing is not about discovering a secret combination of slider values.
It is about understanding what the photograph needs, making a decision, evaluating the result, and then determining whether that stage is working well enough to move forward.
That is why I use:
Diagnose → Decide → Move On
Ask:
What is actually wrong?
Then ask:
Which stage of the workflow owns that problem?
Make the adjustment.
Evaluate the photograph.
Then move forward.
The Bigger Lesson
When an underwater photograph looks flat, the instinct is often to add more.
- More Contrast.
- More Clarity.
- More Dehaze.
- More Saturation.
- More masking.
Sometimes those adjustments are exactly what the photograph eventually needs.
But they may not be what it needs first.
Before adding drama, examine the underlying tonal structure.
Ask whether the highlights, midtones, shadows, Whites, and Blacks are creating enough separation for the photograph to have depth.
If that structure is weak, strengthen it first.
Then allow Presence and Color to build on top of it.
The result is easier to control, more believable, and far more repeatable.
Structure before drama.
Try It on One of Your Own Reef Photographs
Open a reef photograph that feels flat.
Before reaching for Clarity, Dehaze, Saturation, or another mask, ask yourself:
Is this really a Presence problem, or is the tonal structure still unfinished?
That one question may completely change the way you approach the photograph.
More importantly, it helps you understand why the adjustment works.
That is what The Underwater Edit Clinic is designed to teach:
Real photographs. Real problems. Better decisions.
If you would like a simple reference for diagnosing common Lightroom problems in underwater photographs, you can also download my free 10 Lightroom Fixes for Underwater Photos:
https://info.robertherb.com/lm-3
Coming Next
In the next Clinic, we will move from a global problem to a different kind of decision:
What happens when the subject looks good, but the water does not?
That is where deciding between global and local correction becomes critical.
Bob Herb
Robert Herb Photography


Comments
Post a Comment
Please let me know your comments.