The Consistent Underwater Edit #4: Presence Adds Definition After Exposure

You have corrected the White Balance and worked through the Exposure, which already improves the underwater photograph.
However, it might still feel a little flat or lacking in depth.
Many photographers instinctively reach for Clarity or Dehaze tools at this stage, pushing sliders to add more punch to the image.
While this can sometimes produce a pleasing effect initially, it often leads to unintended consequences: the water may appear overly dark, the reef can look harsh and crunchy, backscatter becomes more noticeable, fine details get exaggerated and turn harsh, and colors become overly intense and unnatural.
Although these adjustments might give the image more impact at first, they do not necessarily make it better overall.
That’s why Presence is placed third in The Consistent Underwater Editing System.
White Balance → Exposure → Presence → Color → Masking → Final Adjustments
Presence should be used to enhance a photograph that already has a solid foundation.
It’s not meant to fix issues with White Balance or Exposure; those should be addressed first.
The aim isn't merely to make the image stronger but to add the right kind of definition, in the right amount, tailored to each specific photograph.
Presence Comes After the Foundation
In the previous two articles in this series, we established the first two steps of the workflow.
White Balance comes first because it establishes a believable color foundation for the photograph.
Exposure comes next because, once the colors are reliably rendered, you can then make more informed decisions about adjusting brightness, highlights, shadows, whites, blacks, and the overall tonal range of the image.
This sequence helps create a balanced and compelling photograph, providing a solid base for further editing and refinement.
If you missed the previous article, you can read:
The Consistent Underwater Edit #3: Exposure Comes After White Balance
https://robertherb.blogspot.com/2026/07/consistent-underwater-edit-exposure-after-white-balance.html
Now we are ready to work with Presence.
Remember, the order in which we make adjustments is important.
If an underwater photograph still appears too blue, too green, too dark, too bright, or tonally unbalanced, adding Clarity or Dehaze might make the issue look different, but it doesn't actually fix the underlying problem.
Sometimes, you might even find the image looks better temporarily because it has more contrast.
However, this doesn't mean the core issue has been addressed.
Presence is meant to enhance and strengthen the overall appearance, not to serve as a rescue tool to fix fundamental problems.
What Do I Mean by Presence?
For this workflow, I use the term Presence to refer to the stage where we start making improvements:
- Definition,
- Separation,
- Perceived detail.
These qualities help a subject appear more distinct and assist the viewer in perceiving the structure within the underwater scene.
For example, imagine a sea turtle swimming through blue water.
After setting White Balance and Exposure correctly, the turtle might still need a bit more visible texture and separation from the water behind it to stand out clearly.
Now consider a reef scene.
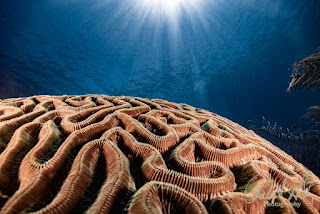
The exposure could be just right, but the coral structure might lack enough definition to communicate the detailed appearance you remember seeing during the dive.
Similarly, a wreck photographed through a long water column might have good tonal information but still feel visually distant or flat.
These scenarios illustrate what we call Presence decisions.
The key is to identify what is actually missing before choosing the appropriate tool to address it.
This brings us back to the decision-making framework we’ve been using throughout this series:
Diagnose → Decide → Move On.
Texture, Clarity, and Dehaze Do Different Jobs
Texture, Clarity, and Dehaze can all enhance the strength of an underwater photograph.
However, it's important to understand that they are not interchangeable tools.
Grasping the differences between these adjustments is far more valuable than simply memorizing slider settings.

Texture
Texture primarily draws attention to textured details.
In underwater photography, this can include coral surfaces, the skin of a sea turtle, fish scales, the surface of a wreck, or tiny physical details within a reef scene.
Enhancing texture helps these details stand out without relying solely on the stronger overall contrast you might achieve through other controls.
However, more texture doesn't automatically mean more detail.
Pushing it too far can make natural surfaces appear coarse or exaggerated.
The important question isn't:
How much texture should I use?
Instead, ask yourself:
Does this photograph need more visible texture?
Diagnose first, then decide.
Clarity
Clarity impacts contrast and separation in different ways.
Instead of just emphasizing texture, Clarity can make the structures and edges within a photograph stand out more distinctly.
This can be especially useful when a subject tends to blend into its background or when a reef scene requires a bit more visual separation to draw the viewer's eye.
However, it's important to note that under the water, Clarity can quickly become overwhelming.
What once looked natural might start to appear overly sharp or hard-edged.
A fish that originally looked natural can begin appearing hard-edged.
A reef can start looking brittle.
A diver's skin can become unflattering.
Particles in the water can become easier to see.
What initially adds definition can easily turn into the familiar overprocessed or "crunchy" look many photographers aim to avoid.
The goal with Clarity should be to enhance the photograph’s sense of structure and depth without making it obvious that Clarity was used as a tool.
It should support the image’s communication, not shout it out loud.
Dehaze
Dehaze deserves special consideration when working with underwater photography.
Water acts as a medium that exists between the camera and your subject, and as the distance increases, both contrast and apparent clarity often diminish.
This makes the Dehaze tool particularly appealing, since adjusting it can quickly improve the visibility of distant elements like reefs, wrecks, or blue-water scenes, making them appear more separated and defined.
However, it's important to understand that Dehaze influences more than just your perception of haze; as the image changes, you may notice increased contrast, darker shadows, richer colors, and a significant shift in how the surrounding water appears.
This is especially crucial with blue water, where a slight adjustment can help achieve better separation and depth.
On the other hand, excessive use of Dehaze can turn what was a natural, believable blue water into something unnaturally dark or overly saturated.
That doesn’t mean Dehaze is inherently bad; rather, it should be used thoughtfully and intentionally.
Don’t rely on it just because you took the photo underwater. Instead, apply it after diagnosing a specific issue that Dehaze can effectively address, ensuring your image looks both natural and compelling.
Pro Tip: Dehaze - Use only after the foundation has been built, and with caution.
Diagnose Before You Touch the Slider
.jpg "Diagnose, Decide, Move On Before Adjusting Presence")
This is where the Consistent Underwater Editing System starts saving you valuable time.
Instead of randomly tinkering with all three controls, take a moment to step back and carefully examine the photograph.
Ask yourself: what exactly is missing?
Does the subject require more visible surface detail?
If so, this might point you toward adjusting Texture.
Does the scene need stronger local separation and definition?
In that case, enhancing Clarity could be the best choice.
Is the water column diminishing the apparent separation of distant elements?
That might be a sign to consider applying Dehaze.
Sometimes, the correct answer is that nothing is missing; that’s an equally important realization.
Remember, you don’t need to move every slider just because Lightroom offers the option.
Use your judgment and experience to guide your adjustments, ensuring each change serves a clear purpose and improves the overall image.
Underwater Images Can Become Overprocessed Quickly

Underwater photographs are particularly sensitive to excessive Presence adjustments because there is often more happening in the image than initially apparent.
For instance, there may be suspended particles in the water, backscatter, noise from a higher ISO setting, or fine reef textures throughout the frame.
Additionally, subtle gradients in the blue water can be present.
When you increase apparent definition and contrast, you can accentuate the elements you want viewers to notice, but you may also amplify those you'd prefer they overlook.
Backscatter serves as a prime example: adding strong Texture, Clarity, or Dehaze does not create new backscatter that wasn’t already present, but it can significantly increase the visibility of existing particles.
The same applies to noise: a photograph taken in low light may initially appear smooth, but pushing the Presence controls aggressively can make the noise much more noticeable.
That’s why I don’t believe in fixed recipes such as "Add this much Texture," "Always use this much Clarity," or "Every underwater photograph needs Dehaze."
Different images have different issues, and your task is to first identify the specific problem before applying adjustments.
Let the Subject and Scene Determine the Decision
Imagine three underwater photographs.
The first is a close-up shot of a sea turtle.
The White Balance appears natural, and the Exposure is well-balanced.
However, the image could benefit from a bit more definition in the turtle’s skin and shell to enhance detail and texture.
The second photograph captures a wide reef scene.
The colors and exposure are set appropriately, but the reef lacks sufficient separation to clearly communicate its structure and depth, making it harder to read the scene’s complexity.
The third image shows a wreck through a longer water column.
The wreck appears distant because the water between the camera and the subject has reduced apparent contrast, dulling the overall clarity.
All three photographs might initially be described as "flat," but they are not necessarily flat for the same reason.
Recognizing this distinction is important.
If you apply the same Presence treatment to all three photographs, you are no longer responding to the photograph.
You are responding to a habit.
The Consistent Underwater Editing System is designed to break that habit.
Diagnose the photograph.
Decide what it needs.
Make the adjustment.
Move on.
How Do You Know When to Stop?

This may be one of the most crucial questions when it comes to Presence.
After you've made an adjustment, take a moment to look at the photograph again and ask yourself:
Does the image appear more defined and clear, or does it just seem more heavily processed?
These two outcomes are very different.
Presence should help the viewer see the subject clearly and understand the scene, not overshadow it or become the main focus itself.
If the turtle appears more dimensional, that’s a positive sign.
If the reef has better separation from its surroundings, that’s good.
If the wreck feels less obscured by the water column, that’s also a success.
However, if you start noticing that the edges of objects look harsh, the water appears unnaturally dark, the coral looks crunchy or overly textured, or every tiny particle in the water suddenly demands attention, then you’ve likely gone too far.
Remember, your goal isn’t to create maximum Presence at all costs; it’s to create just enough to effectively communicate the scene.
Once you've achieved that, it’s time to move on and not overdo it.
Presence Is Not Your Signature Style
.jpg "Presence Is Not Your Signature Style")
There’s another important distinction to consider.
Over time, you might find that you prefer underwater photographs with a specific balance of contrast, softness, color, or visual drama: elements that can become part of your signature style.
However, developing your signature style should come later in the process.
At this stage in your workflow, the priority is to build the photograph correctly.
First, establish White Balance to create a believable color foundation.
- Next, establish Exposure and the usable tonal range of the photograph.
- Then, use Presence to strengthen definition, separation, and perceived detail.
- Next, refine Color.
- Use Masking when specific areas of the photograph need local attention.
- Finally, Final Adjustments are where the finished photograph begins to reflect your signature style.
Trying to create your signature style too early can be counterproductive, causing you to focus on individual sliders instead of developing a consistent, repeatable process that leads to better results and greater control over your images.
The Presence Checkpoint

Before leaving this step, ask yourself three questions:
Does the subject have enough definition?
Does the scene have the separation it needs?
Does the photograph still look natural?
If the answer is yes, stop.
You have finished the Presence step.
Do not keep adding more simply because the controls are available.
Move on to Color.
That is how a repeatable editing system becomes faster.
You stop asking:
"What else can I change?"
And start asking:
"What does this photograph need next?"
The Consistent Underwater Edit So Far

We now have the first three steps in place:
1. White Balance
Establish believable color and correct the strongest unwanted cast.
2. Exposure
Build a usable tonal range after the White Balance foundation is established.
3. Presence
Strengthen definition, separation, and perceived detail without creating an overprocessed photograph.
Next, we will move into Color, where we will look at how to refine color without using saturation to compensate for problems that should have been solved earlier in the workflow.
The sequence continues:
White Balance → Exposure → Presence → Color → Masking → Final Adjustments
And the decision-making process remains the same:
Diagnose → Decide → Move On
The more consistently you follow that process, the less time you spend guessing and the easier it becomes to understand exactly what your underwater photograph needs next.
Want to Build a More Consistent Lightroom Workflow?
If your underwater edits still feel inconsistent, the answer is probably not another preset or another random Lightroom adjustment.
It is learning to recognize what the photograph needs, make the right decision, and then move on.
My free guide, 10 Lightroom Fixes Every Underwater Photographer Should Know, is a good place to start. It covers common problems underwater photographers face and helps you approach those problems more intentionally.
https://info.robertherb.com/lm-3
For Oceanic Explorers who are ready to go deeper, I am also preparing the first Underwater Lightroom Mastery six-week small-group cohort, beginning August 19, 2026.
This program is designed to help you take The Consistent Underwater Editing System and apply it to your own photographs through guided practice, feedback, and repetition.
The goal is not simply to know the six steps.
It is to become confident enough to look at one of your own underwater photographs, diagnose what it needs, make the right adjustment, and move on without second-guessing every decision.
That is where a workflow begins to become your workflow.
White Balance → Exposure → Presence → Color → Masking → Final Adjustments
Diagnose → Decide → Move On
The first Underwater Lightroom Mastery cohort begins August 19, 2026. If you are ready to apply The Consistent Underwater Editing System to your own photographs through guided practice, feedback, and repetition, learn more and apply for the six-week small-group program here:
https://info.robertherb.com/cohort-signup-page
Until next time, dive safely, shoot thoughtfully, and edit with intention.
Bob Herb
Robert Herb Photography


Comments
Post a Comment
Please let me know your comments.