Mastering the Depth of Field Effect in Post-Processing
 |
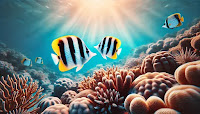
This AI-generated image shows an example of how DoF can be used to highlight the foreground and blur the background. |
In underwater photography, depth of field (DoF) is crucial for compositional effectiveness. It enables photographers to isolate subjects, like a reluctant seahorse amidst a vibrant seagrass backdrop, or to highlight the curious expression of a turtle in a colorful reef environment. However, achieving the desired DoF in-camera can present challenges due to movement, lighting variations, and water conditions, which often need to align favorably. Fortunately, post-processing techniques in Adobe Lightroom provide practical tools to enhance or even replicate the depth of field, allowing photographers to achieve a more professional and polished appearance in their images.
This detailed guide provides insights on utilizing Lightroom's features to adjust the depth of field while preserving a natural underwater aesthetic. Each tool will be discussed in depth, including how to locate it and practical examples to demonstrate effective application.
Why Depth of Field is Vital in Underwater Photography
Depth of field is a powerful tool that guides the viewer's gaze toward your chosen focal point, whether the intricate details of a macro nudibranch or the expansive beauty of a wide-angle reefscape. By skillfully manipulating focus, you can illuminate the mesmerizing wonders of the underwater world, allowing your subject to shine while gently blurring distracting backgrounds. This technique showcases the vibrant colors and delicate textures of foreground elements and enhances the overall composition, creating a captivating visual experience that draws the eye deeper into the scene.
Lightroom Tools for Enhancing or Simulating Depth of
Field
Here’s a step-by-step breakdown of the best tools Lightroom
offers to help you control depth of field during editing:
1. Radial Gradient Tool
- Location:
Develop Module > Toolbar > Radial Gradient (Shortcut: Shift + M)
- Purpose:
Create a subtle blur around your subject, mimicking a shallow depth of
field.
How to Use:
- Select
the Radial Gradient Tool from the toolbar.
- Drag
to create an oval or circle around your subject.
- Check
the "Invert" box to apply the effect outside the selected
area.
- Reduce
the Sharpness slider for a soft, natural blur.
- Adjust
Clarity and Texture sliders to further reduce detail in the
background.
- Use
the Feather slider to blend the effect smoothly into the image.
Best Scenarios:
- Macro
Photography: Isolate a nudibranch crawling on coral, blurring the
distracting background sand.
- Fish
Portraits: Highlight a juvenile spotted drum, softening the coral or sponge around it.
- Wide-Angle
Shots: Blur the reef behind a diver holding a camera to emphasize
their presence.
- Pelagic
Encounters: Frame a jellyfish or shark in open water, reducing
attention to distant surface reflections.
- Abstracts:
Focus on an anemone’s delicate tentacles while blurring the surrounding
coral structure.
2. Adjustment Brush Tool
- Location:
Develop Module > Toolbar > Adjustment Brush (Shortcut: K)
- Purpose:
Paint specific areas of the image to blur distractions or enhance focus.
How to Use:
- Select
the Adjustment Brush Tool from the toolbar.
- Paint
over the areas you want to blur, such as the background or foreground.
- Adjust
the Sharpness, Texture, and Clarity sliders to soften
details.
- Use a
soft brush with a feathered edge for natural transitions.
- Fine-tune
with the Size and Flow sliders for precise control.
Best Scenarios:
- Turtle
Portraits: Blur distant coral behind a swimming turtle for a cleaner
composition.
- Macro
Subjects: Remove sharpness from surrounding algae in a shrimp photo.
- Wreck
Details: Soften the background around a diver exploring a shipwreck.
- Dynamic
Shots: Blur water currents behind a free-swimming fish for added
motion.
- Environmental
Portraits: Highlight a diver while minimizing clutter in the
background.
3. Linear Gradient Tool
- Location:
Develop Module > Toolbar > Linear Gradient (Shortcut: M)
- Purpose:
Apply a gradual blur to parts of the image, which is ideal for creating perspective
effects.
How to Use:
- Select
the Linear Gradient Tool from the toolbar.
- Drag
across the area to create a gradient blur.
- Reduce
the Sharpness, Clarity, and Texture sliders to soften
the area.
- Adjust
the gradient’s size and feathering for seamless blending.
Best Scenarios:
- Reefscapes:
Soften the sandy bottom to emphasize the reef above.
- Pelagic
Species: Blur the water column below a spotted eagle ray to highlight its
movement.
- Shipwrecks:
Reduce detail in the distant parts of a wreck to guide the eye toward the
foreground.
- Wide
Reef Shots: Focus on vibrant corals in the foreground, softening the
background.
- Shark
Encounters: Blur the distant ocean to emphasize a shark in the
foreground.
4. Masking with AI Subject Detection
- Location:
Develop Module > Masking Panel > Select Subject
- Purpose:
Automatically detect and isolate your subject, allowing for precise
adjustments to background areas.
How to Use:
- Open
the Masking Panel and select Select Subject.
- Lightroom
will automatically identify the subject in your image.
- Invert
the mask to apply changes to the background instead.
- Use Sharpness,
Texture, and Clarity to blur the background naturally.
- Combine
this with the Radial Gradient Tool for added depth.
Best Scenarios:
- Fish
Close-Ups: Enhance the sharpness of a lionfish while softening the
coral behind it.
- Macro
Critters: Blur the area around a seahorse to reduce distractions.
- Diver
Shots: Focus on a diver’s silhouette while softening the surrounding
reef.
- Pelagic
Encounters: Make a manta ray pop by reducing the clarity of the surrounding water.
- Schooling
Fish: Highlight the central cluster of fish while softening distant
individuals.
5. Texture and Clarity Sliders (Global and Local)
- Location:
Develop Module > Presence Panel (Global) or Masking Panel (Local
Adjustments)
- Purpose:
Use these sliders to enhance or soften details selectively, adding
perceived depth.
How to Use:
- Use Global
Sliders sparingly to avoid over-processing.
- Pair the sliders with masks, radial gradients, or brushes for selective adjustments.
- For
backgrounds, reduce Clarity and Texture to simulate blur.
- Enhance
the subject with increased Texture for crispness.
Best Scenarios:
- Highlight
Details: Enhance a fish’s scales while softening the reef behind it.
- Foreground
Focus: Sharpen coral in the foreground while blurring the midground.
- Motion
Simulation: Blur water currents while keeping a moving fish sharp.
- Reef
Scenes: Soften details of distant coral to emphasize the foreground.
- Subject
Pop: Sharpen a turtle’s face while softening its shell and surrounding
water.
Pro Tips for Natural Depth of Field Effects
- Feathering
is Key: Use feathering to blend adjustments seamlessly into the image.
- Subtlety
Wins: Avoid excessive blur, making your photo look artificial.
- Balance
the Focus: Keep your subject sharp, but let the background complement
the composition.
- Zoom
Out: Review your edits at full image size to ensure they feel natural.
- Combine
Tools: Use multiple techniques (e.g., Radial Gradient + Adjustment
Brush) for complex scenes.
6. Lens Blur: AI-Powered Depth of Field Adjustment
- Location: Develop Module > Masking Panel > Lens Blur
- Purpose: Automatically create depth of field effects by selectively blurring areas of your photo based on detected depth or subject focus.
How to Use:
- Navigate to the Masking Panel in the Develop Module and select Lens Blur.
- Lightroom will analyze your photo and determine depth areas, automatically identifying your subject and separating it from the background.
- Adjust the Blur Strength slider to control the intensity of the background blur.
- Fine-tune the effect using the Sharpness, Clarity, and Texture sliders to ensure the blur transitions naturally.
- For additional customization, combine the Lens Blur effect with other tools, such as the Adjustment Brush or Radial Gradient, to refine edges or emphasize specific areas.
Example Scenarios:
- Macro Critters: Use Lens Blur to isolate a pygmy seahorse clinging to coral, letting the background dissolve into soft hues.
- Fish Portraits: Highlight a butterflyfish in the foreground while gently blurring the reef behind it.
- Wide-Angle Reef Scenes: Add depth to a scene featuring a diver and reef, keeping the diver sharp while softening the distant coral.
- Open Water Subjects: Apply Lens Blur to an open-water shot of a shark, creating a dreamy gradient of focus into the blue.
- Wreck Photography: Enhance focus on the intricate details of a shipwreck foreground while fading the distant structures.
Why Lens Blur Stands Out
Lens Blur leverages Adobe’s AI capabilities, making it one of the most user-friendly tools for simulating depth of field. Unlike manual adjustments with Radial or Linear Gradients, Lens Blur automatically detects depth layers, saving time and providing a natural, realistic blur effect. This tool is particularly effective in underwater photography, where controlling actual DoF during shooting can be challenging due to the fluid environment.
Pro Tip: Combine Lens Blur with Radial Gradients for Maximum Impact
For a polished look, apply Lens Blur to the background and then add a Radial Gradient around your subject for additional refinement. This layered approach enhances the sense of depth while ensuring your subject remains sharp and compelling.
Conclusion
Mastering depth of field in Lightroom allows you to create
compelling underwater images that guide the viewer's eye and tell a story.
Whether working on a macro shot or a wide-angle reefscape, these tools
and techniques will elevate your underwater photography to new depths.
What challenges have you faced when editing for depth of
field? Share your experiences and photos in the comments below—I’d love to hear
how these tips work for you!
Stay Connected
Follow my blog for more tips and tutorials on underwater photography. Let's dive deeper into the art and craft of capturing the marine world!
Subscribe to my blog for more tips and tutorials on underwater photography. Remember to share your processed photos on social media using the hashtag #RobertHerbPhotography. I look forward to reviewing your results.
New Online Training Program
I am excited to announce that I am creating an online training program to teach underwater hobbyists and enthusiasts how to enhance their photos using Adobe Lightroom. If you are interested in this training or need more information, please go to (Underwater Photo Training) or contact me at bob@robertherb.com to express your interest and to be notified about the details and start date of the classes.
Stay tuned and "Follow" for upcoming blogs on underwater photography tips and tricks for more in-depth insights. Please leave your comments and suggestions. Enjoy your diving and shooting experience!
I am eagerly anticipating your valuable feedback and suggestions.
Sincerely,
Bob Herb
|
|


Comments
Post a Comment
Please let me know your comments.