Creating Custom Color Profiles for Different Depths in Lightroom
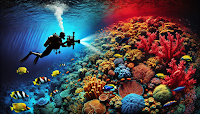
AI-generated image demonstrating the underwater color loss due to depth
Unlocking the Vibrancy of the Underwater World with Precision Adjustments
One of the most exhilarating aspects of underwater photography is the opportunity to capture the stunning array of life and the breathtaking landscapes hidden beneath the ocean's surface. As we venture deeper into the water, however, a fascinating phenomenon occurs—the vibrant hues of reds and yellows gradually fade away, yielding a tranquil palette dominated by blues and greens. This color shift can make conveying the true beauty of what lies below is challenging. Creating custom color profiles in Adobe Lightroom—designed explicitly for varying depths—can be game-changing to combat this loss of vibrancy. By fine-tuning these profiles, you can effectively restore the vivid colors of your underwater shots, allowing the rich details and mesmerizing scenes to come alive in a way that genuinely reflects the enchanting underwater world.
In this comprehensive guide, I will take you on an in-depth exploration of the latest tools available in Lightroom, highlighting its innovative AI-driven features. You'll discover how to create, save, and utilize depth-specific profiles tailored to enhance your underwater photography. Following these detailed steps, you can edit your images precisely and consistently, ensuring that the enchanting underwater scenes you experienced during your dive are beautifully preserved in your final images.
Understanding Depth and Color Loss
- Shallow
waters (0-10 feet): Reds and yellows remain visible, but minor
adjustments can enhance vibrancy.
- Mid-depths
(10-30 feet): Reds fade, greens dominate, and clarity decreases.
- Deeper
waters (30-90 feet): Blues dominate, requiring significant adjustments
to restore warmth.
- The
abyss (90+ feet): Artificial light becomes essential, and natural
colors are almost nonexistent.
Creating custom profiles for these depth ranges will save time, improve accuracy, and achieve consistent results.
Step 1: Preparing Your Workspace in Lightroom
Switch to the Develop Module
- Location:
Top-right corner of Lightroom.
- Shortcut:
Press D.
- The
Develop Module is your main editing space, offering all the tools to create custom profiles.
Enable Soft Proofing
- Location:
Bottom-left corner, near the histogram.
- Shortcut:
Press S.
- This
simulates how your edits appear on different devices or prints,
ensuring platform consistency.
Create Virtual Copies
- How
to Create: Right-click your photo and select Create Virtual Copy.
- Why
It’s Useful: Allows you to experiment with adjustments while keeping
your original file untouched.
Pro Tip: Rename your virtual copies (e.g., “10ft
Profile” or “60ft Adjustments”) to stay organized.
Step 2: Correcting Color for Depth-Specific Challenges
Shallow Waters (0-10 Feet): Vibrant Shallows
Even with minimal color loss, enhancements can bring your
images to life.
- White
Balance Selector (Eyedropper Tool)
- Location:
Basic Panel, next to the White Balance sliders.
- Shortcut:
Press W.
- How
to Use: Click on a neutral area in the photo, such as white sand or
light-colored coral. This sets a baseline for color correction.
- HSL
(Hue, Saturation, Luminance) Adjustments
- Location:
HSL Panel in the Develop Module.
- How
to Use:
- Increase
Red Saturation (+15) to enhance coral and fish tones.
- Boost
Yellow Luminance (+10) for a warmer overall feel.
- AI
Masking for Selective Adjustments
- Location:
Masking tool (top-right toolbar).
- Shortcut:
Press Shift + W.
- How
to Use: Use Select Subject to enhance specific elements like brightly colored fish, ensuring they stand out against the backdrop.
Example: A photo of a reef at 10 feet might benefit
from a slight temperature increase (+5) and targeted adjustments to make reds
and oranges pop without oversaturating.
Mid-Depths (10-30 Feet): Greens and Blues Dominate
At this range, greens dominate the scene, and clarity diminishes.
- Dehaze
Tool for Clarity
- Location:
Basic Panel, below Contrast.
- How
to Use:
- Apply
Dehaze (+15 to +20) to cut through murkiness.
- Be
careful to do it sparingly, as it can introduce unwanted artifacts.
- Color
Range Masking
- Location:
Masking Tool → Color Range.
- How
to Use:
- Select
areas of faint reds or oranges.
- Increase
Saturation (+20) to restore warmth in subjects like clownfish or soft
corals.
- Fine-Tuning
Green and Blue Tones in HSL
- Adjust
Green Hue (-10) toward a more natural teal.
- Increase
Blue Luminance (+10) to brighten the water.
Example: A schooling fish photo at 20 feet might
require clarity adjustments and green-to-blue balance corrections for realism.
Deeper Waters (30-60 Feet): Blue Dominance
By now, reds and yellows are almost nonexistent.
- Adjust the White Balance Temperature
- How
to Use:
- Increase
Temperature (+20 to +40) to warm up the scene.
- Fine-tune
the Tint slider toward magenta (+5 to +10) to counteract greenish
hues.
- Use
the Tone Curve for Contrast
- Location:
Tone Curve Panel in the Develop Module.
- How
to Use:
- Add
a slight S-curve to enhance contrast while preserving mid-tones.
- Example:
Brighten the highlights on a diver’s silhouette while deepening the
shadows of the surrounding water.
The Abyss (60+ Feet): Artificial Light and Monochrome
Tones
Photos taken at these depths often rely on strobes or
torches.
- Custom
Calibration Panel Adjustments
- Location:
Bottom of the Develop Module.
- How
to Use:
- Lower
Blue Primary Saturation (-10).
- Adjust the Green Primary Hue (-5) to create a balanced, natural look.
- AI-Powered
Noise Reduction
- Location:
Detail Panel → Noise Reduction.
- How
to Use:
- Increase
Luminance Noise Reduction (+30) to smooth out the image without
losing detail.
Step 3: Saving Custom Profiles
Create and Save Presets
- How
to Save:
- Make
all desired adjustments for a specific depth.
- Go
to the Presets Panel (left sidebar).
- Click
the + icon and select Create Preset.
- Name
your preset (e.g., “Shallow Water Adjustments”).
- Select
the adjustments you want included in the preset (Basic, HSL, Calibration,
etc.).
Apply Presets to Multiple Images
- How
to Use:
- Select
all relevant images in the Library Module.
- Right-click
and choose Sync Settings to apply your custom profile.
Step 4: Leveraging AI for Efficiency
- Auto
Adjustments as a Starting Point
- Shortcut:
Press Shift + U.
- Lightroom’s
AI analyzes your photo and applies a baseline adjustment that you can
refine.
- AI
Masks for Seamless Edits
- Use
tools like Select Background or Select Subject to make
targeted edits.
Conclusion
Custom color profiles designed for various underwater depths can significantly enhance your editing workflow, allowing for stunning, lifelike results. By delving into the powerful tools Lightroom offers—including its innovative AI-powered features—you can craft a unique library of presets tailored to the unique hues of underwater environments. These depth-specific presets save you precious editing time and elevate the vibrant beauty of your underwater photography to new heights. Together, let’s revive the mesmerizing colors of the ocean, one carefully created profile at a time!
What profiles have you saved in Lightroom? Share your tips and favorite profiles in the comments below!
Written by Robert Herb – empowering underwater photographers to capture and enhance the beauty of our oceans.
Stay Connected
Follow my blog for more tips and tutorials on underwater photography. Let's dive deeper into the art and craft of capturing the marine world!
Subscribe to my blog for more tips and tutorials on underwater photography. Remember to share your processed photos on social media using the hashtag #RobertHerbPhotography. I look forward to reviewing your results.
New Online Training Program
I am excited to announce that I am creating an online training program to teach underwater hobbyists and enthusiasts how to enhance their photos using Adobe Lightroom. If you are interested in this training or need more information, please go to (Underwater Photo Training) or contact me at bob@robertherb.com to express your interest and to be notified about the details and start date of the classes.
Stay tuned and "Follow" for upcoming blogs on underwater photography tips and tricks for more in-depth insights. Please leave your comments and suggestions. Enjoy your diving and shooting experience!
I am eagerly anticipating your valuable feedback and suggestions.
Sincerely,
Bob Herb
|
|


Comments
Post a Comment
Please let me know your comments.